Since I wanted more control over the design process than I felt that I got with my last architect (and it cost considerably more than I was ready for too), I had been toying with the idea of doing my own drawings for this smaller project. After all, I had renovated 3 apartment units by hand already with less detail and this whole building was only really 2 units. Over the holidays talking to my brother-in-law (who happens to also be an architect), he asked me why I even needed an architect. I thought there were at least parts that would be complicated enough (like rebuilding stairs between floors 2 & 3) that the city would require an actual architect's stamp to approve, but he pointed out that because I was still in the residential code that a stamp wasn't a requirement (If my unit used a common entry or stairs, or if it were more than 4 units, then I would have been in the commercial code, which required it) due to the way that I intended to lay it out.
So the next question was how was I going to do the drawing designs myself. I had briefly used AutoCAD in high school, so it didn't seem too scary to try, but were there free options? I had also tinkered with SketchUp, but how to tie all those shapes into something that could be used for a building? Again my brother-in-law pointed me in the right direction: a free trial of Revit, which makes drawing a wall as simple as click here, click there, wall drawn and most importantly all of the detail parameters that go along with the wall are baked into it. Needless to say, I'm so glad for the advice because it would have been MUCH more difficult with out using this program.
Next I had to learn how to use it, and fast before the free trial ran out. Thank god for YouTube and specifically the Balkan Architect channel's short tutorials for each piece of the puzzle. Anyone learning Revit, just binge this while tinkering in your project and you'll become fairly capable, fairly fast.
So it still took a while (nearly 4 months) to get to a comfortable design and get it into a presentable format to submit for permits. It started by drafting basic outline of the layout, then printing it off so that I could write in the dimensions on it while measuring the existing building. I literally took a tape measure and laser measure to the wall and hung from ladders to measure ceiling/floor heights. Then I took those and adjusted my basic outline to a more accurate picture of the exiting building. From there, it was the fun part for someone detail oriented as myself. I used a variety of Design Options to decide on the layout of various parts of each unit (overall unit makeup, kitchen style, bathroom layout, etc.) and make sure that I could lay out the units in a way that was both marketable, functional (water walls of each units stacked), and livable. Once I got it to a place that felt close, I started laying out different sheets for printing the drawings out then annotating/labeling everything. Eventually I got it to a point that I could submit to the city for approval (really just to enter their maze again).
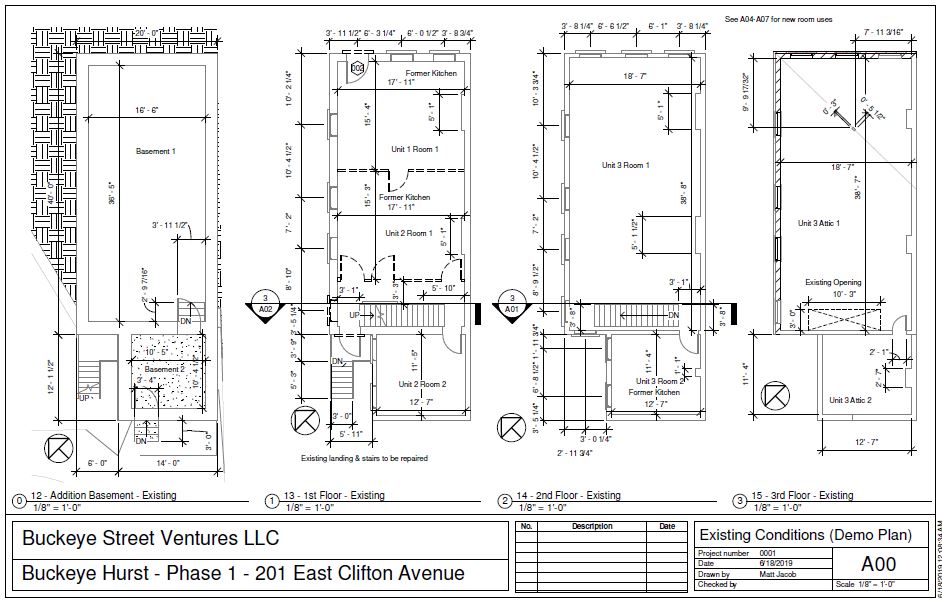
Here are a couple pictures of the drawings that I came up with. Overall I think I'd get a passing grade for my rough semester at tinkering in architecture.


No comments:
Post a Comment