July 14, 2019

Common sense vs. the building code: an appeal lost & a less safe outcome

So as I referenced in the last post, there was one particular part of my building design that was having trouble falling into the imaginary box envisioned by the building code (Residential Code of Ohio 2013). First, I was actually fortunate that my 2-unit building was fell under the RCO rather than the more strict Ohio Building Code (used for commercial projects). This was mainly because each unit has a separate entrance that does not share a common entryway or stairwell. Using the RCO also means that an architect's stamp is not required to submit drawings for permits, which enabled me to do my own drawings.

Another advantage of the RCO was that my top unit, which shares the 2nd and 3rd floors, did not need a second form of egress; however each bedroom still needs a second Emergency Escape and Rescue Opening (EERO) to be counted as a sleeping room. To the layman, this means that I didn't need a second stairwell or fire escape to use the upper floors, but each bedroom needs a window that meets certain requirements. On the 2nd floor, this meant just making sure each bedroom was designed with an existing window next to it; pretty easy. On a typical 3rd floor, it would be the same, because a fire fighter could get their ladder to that window for emergency rescue if the primary form of egress (bedroom door) were blocked. In any room other than a bedroom, you only need that one primary form of egress - the idea being that you'll be more alert in rooms that you aren't asleep in and therefore can get out the primary egress door before it becomes blocked by fire (this becomes a dubious assumption when you consider how many times you've fallen asleep on your couch watching TV or used a pullout couch). This meant that I was free and clear to use the 3rd floor space ,with just the staircase, for anything as long as it didn't involve sleeping.

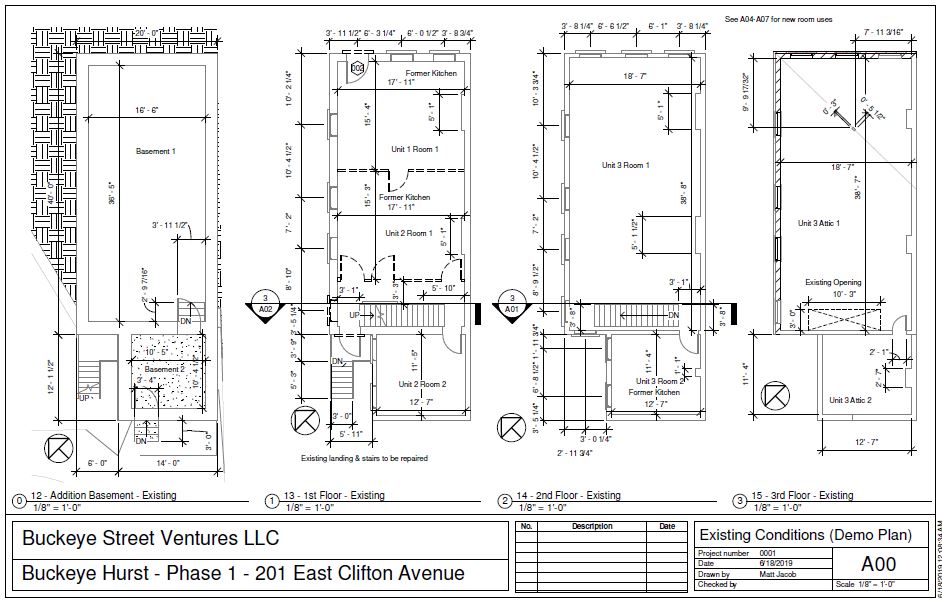
The problem that arose in my design was partially around the need for another bedroom and bathroom to make my financials work and also around the shape of my roof plus how it interacted with the 3rd floor layout to allow a compliant EERO for that bedroom. I have an approx. 4 foot high parapet wall before the roof rafters slope upwards. This parapet wall also has frieze windows inset in it and holds my cornice onto the exterior, so from the street the whole 3rd floor is well hidden as this form wraps around the north and west side of the building. The east side is also a shared party wall with my neighboring building. Due to the layout of the rest of the building, this top end of the 3rd floor was where I needed to add the 3rd bedroom and also a 2nd bathroom to this unit, which made very tight conditions for fitting it there from the start. You can get a sense for this below:


Due to ceiling heights, I had to locate the bathroom next to the party wall and away from the sloped side walls. This mostly left a sloped side-wall as the logical place for an EERO to go, but all of them had challenges in meeting the requirements to count as an EERO (minimum sizing of window height and width, minimum overall window area, maximum distance of the window sill from the floor [44 inches], and that it remain operational). I had a few options to consider:
- The first obvious one is a roof dormer that would allow for the roof to be raised and a typical window to be install in the side wall. Besides the fact that it would have been a serious fight with the historic preservation office, it also would have been difficult to implement due to how high the parapet wall was located. It would have effectively needed to be inside the gutterbox to retain a window that had a low enough window sill.
- The next most obvious option was to expand the size of the frieze windows located in the parapet wall. This again presented a fight with the historic preservation office in altering the existing window sizes, but also presented other issues in meeting the EERO requirements. Even if I could expand the frieze windows to a large enough size to meet the minimums, these windows would still need to remain fully operational and they would likely be between 1 and 3 feet from the floor level. This meant that pets and toddlers would be at risk of inadvertently operating the window and of falling out. In the international building code, operable windows are banned below 2 feet for this reason, however in the RCO they conveniently have "deleted" this section. Strange and dangerous. Next.
- Since I couldn't make any option below the parapet wall work, I looked for a way to provide an EERO above it through a roof window (skylight) that met the requirements. They sell egress roof windows for this purpose when they can be put in a roof opening that is within the 44 inches of the floor, however given my predicament of such a high parapet, I would need to have some extension to get to this height.

In reading Section 310 of the RCO, there seemed to be a logical solution in just the next section detailing how window wells from a basement can use permanently affixed ladders or steps to rise more than 44 inches when they are deeper underground. I figured that this was a similar case in reverse - instead of going through a window then up a ladder/steps, this would be going up a ladder/steps and then out a window to escape and be rescued. Here is what I came up with and it also served a practical purpose of clothing storage:


I knew there would be push-back from the plan examiners since it did not follow the letter of the building code. I worked on multiple iteration of this storage-steps concept and they couldn't make up their minds on whether it was more important to have steps that met the rise/run in another part of the code (even though the window well section specifically said this wasn't required) or to have the size of the landing meet the stairs section. I could either have too steep of steps with the right-sized landing or too small of a landing with the right-sized steps. They preferred to punt on the decision and make me go before the board of building appeals for a ruling. They kept pushing me that the design was too difficult for a user to get out of and I kept making it as easy as possible due to these concerns. They were also simultaneously concerned that a user would hit their head on the window as they went up the steps and also that they would not be able to operate the window latch while on the stairs (there was an actuator to make sure the casement roof window was not heavy while opening it too). To the side before the appeal, they told me that personally they thought it could pass, but had to have the board rule on it to cover themselves.

Lost in all of the fine-tuned design tweaks of the stairs was the overall concept of providing a second way out for EERO for the entire 3rd floor in case of a fire. An entire floor would benefit from any of these designs.

When appeal day finally came (after a month of waiting), I was hit with a series of bad luck. First, the plan examiner that had been handling my case went on vacation and handed off my case to a supervisor (who now was rehashing old concerns and was a much bigger hard-ass). Then when I showed up to the appeals hearing, the entire board of building appeals had just been reappointed (literally getting trained on what to do when I arrived) and this was their 2nd case ever.

I argued my case and the plan examiner's supervisor even seemed to side with me on many of the points that he had pushed back on previously. In the end, they went into private deliberations and then just said: denied. After prodding for more feedback, so that I could decide on whether to resubmit and come back or not, they basically explained that it came down to the idea that with stairs it was too easy to access the roof. Given the one board-member's experience as an architect at UC they'd had problems with students hanging out on rooftops and thought that what I had designed would encourage that. Never even asked a question along those lines in the deliberations for me to respond to. 

Needless to say, I was a little blown back by that response that had never even been mentioned by the plan examiners as a concern as they continued to push for easier access to the roof. Now caught in a Catch 22 between too easy and too difficult of roof access from different parties in the city, it became hard to see how I was ever going to get their blessing for a certified bedroom with an EERO for this floor. Waiting another month and probably wasting it to end up in the same spot didn't make a whole lot of sense.

It was now time for plan B: label this room as something else that doesn't require an EERO and then let people use the room however they will (not something that I can control). In a flip of the script, I actually ended up getting approved on the first blank space with a skylight (and a 3rd floor with only one way out!) rather than the meticulously designed storage steps that could save your life someday. Instead of a bedroom with a en-suite bathroom, I will now be marketing an odd "bonus room" with an en-suite bathroom.

To me, this is a prime example of when common sense didn't prevail against the building code's thousand well-intentioned individual constraints. The intricate box that they tried to create to control the dimensions of the world's buildings didn't have a rational answer to reality. It's not my windmill to fight; I've just got a building to build. Boy, it was frustrating though.


July 1, 2019

Permits as a layman

From the beginning, I always feared permits. No one wants someone looking over their shoulder and scrutinizing their work - let alone forcing you to pay them to do it too. In the past, as I've done interior repairs, I've avoided them and generally speaking, for the types of repairs and light renovations that I was doing, permits might not have even been required. Many of the small rehabbers that I know, similarly, avoid permits at all costs and rarely have been caught despite some of their jobs being much more extensive. Generally I've heard that once you leave the city of Cincinnati limits that the demands that come with getting permits goes way down and it gets more relaxed in complying. Not sure if that's really true, but you should definitely ask around about your area before skipping. Certain areas of town also get much more heavily scrutinized for permitting than others (with OTR being towards the top of places where they are really watching) while other areas can have blatant construction activity and never get checked.

However, I think I should be clear from the start here, I knew that I didn't have that luxury of skipping permits on this project. The building at 201 E Clifton had been vacant at minimum; during the 6 years that I've lived next door and on the longer end; around 15 years since it last operated according to neighbors. On top of its long term vacant status (and the lack of utility service and the like that accompanied that), the city of Cincinnati had also gone after the previous owner hard as an absentee owner - as in took the guy to court for multiple properties that he owned to have them put into receivership and sold off. So my building was definitely fully on the city's radar - as evidenced by the quick issuing of my VBML within a month of purchase and lack of leniency. On top of all that, I'm also on the fringe of the largest intact urban historic district, so there is extra scrutiny from a historic preservation standpoint as well.

So as I've taken the path through doing my own architectural drawings, I've also started from a very green perspective on how to actually go about getting permits (which most people are paying their architect to do for them as well). I started literally by walking into the building department's offices and asking what to do. Besides being handed a bunch of antiquated forms that don't really make sense to someone off the street (even someone college educated like myself) they are very limited in the help that they can provide to get you through the volumes of red tape, rules, and standards that they've weaved together.

The best place to start is really the code itself (and having an old set of drawings from some other project to cheat off of helps a lot too). Some of it is obvious if you've been around buildings, but other parts require a deep dive into the standards for stair rise/run and handrail heights. You've got to start with building in a lot of time for changes and tweaks and revisions, but then also not be afraid to ask questions. I learned that if I came early enough in the morning (when the plan reviewer was less busy) that he'd give my drafts a light look over and tips to point me in the right direction. Many times that was "go read this section of the code" - btw reading the building code has officially topped lease abstracting as the most mind numbing thing ever - and other times it was a more direct problem solving for just the additional notes that I needed to include to comply.

So in my case, I ended up going in for early-morning help sessions 4 times before finally getting my drawings to a level where I should actually submit them. My goal was to get as much of the rust off my plans before submitting as possible. After submitting, my plans came back as needing 15 things addressed, which overall I felt good about as a beginner. However, there were a few that made me question my sanity - such as not being able to use color in my drawings (during 4 meetings with it everywhere and never being told it was a problem!) because they only have black/white scanners (this is 2019 btw). I got the number of items down to 5 and then 1 in subsequent revisions. Some kept coming back because the wording was being nitpicked, but others were making my plans better and clearer.

Eventually the last item (described in the next post) was going to need some extra appealing of the building department's opinions to move forward. But after that (a wasted month), I was able to revise and get approved. My timeline was roughly Oct-Feb to draw and draft my plans before submitting, then Feb-June to get through revisions and the appeal before approval on 6/27/19.

Now with permits in hand after all these months, I'm allowed to pick up a hammer and actually start....more to come on that process.


*I should also add that along with the permits, I also had anticipated difficulty in getting through the historic review of the changes to the building's exterior. Adding back the historic cornice in particular, kept me up at night on what I could/couldn't do and whether the historic preservationists in the area might start fighting any design that I came up with. I was pleasantly surprised with how smooth the process went by talking it through one on one with the Urban Conservator, which can approve some changes without full Historic Conservation Board hearings. She suggested a few changes that made my cornice simpler to build and fit in with surrounding building better and then that was it. I wasn't doing much else that was too crazy (especially given familiarity with historic preservation in the area) so she could give her blessing and it was done that easy.

June 30, 2019

How to be your own architect (if you can get away with it)

After months of dealing with the city' VBML program and getting them off my back finally, it was time to get down to business on working towards rehabbing 201 E Clifton. The Halloween haze had worn off and it was time to sharpen my pencil on my renovation plans now.

Since I wanted more control over the design process than I felt that I got with my last architect (and it cost considerably more than I was ready for too), I had been toying with the idea of doing my own drawings for this smaller project. After all, I had renovated 3 apartment units by hand already with less detail and this whole building was only really 2 units. Over the holidays talking to my brother-in-law (who happens to also be an architect), he asked me why I even needed an architect. I thought there were at least parts that would be complicated enough (like rebuilding stairs between floors 2 & 3) that the city would require an actual architect's stamp to approve, but he pointed out that because I was still in the residential code that a stamp wasn't a requirement (If my unit used a common entry or stairs, or if it were more than 4 units, then I would have been in the commercial code, which required it) due to the way that I intended to lay it out.

So the next question was how was I going to do the drawing designs myself. I had briefly used AutoCAD in high school, so it didn't seem too scary to try, but were there free options? I had also tinkered with SketchUp, but how to tie all those shapes into something that could be used for a building? Again my brother-in-law pointed me in the right direction: a free trial of Revit, which makes drawing a wall as simple as click here, click there, wall drawn and most importantly all of the detail parameters that go along with the wall are baked into it. Needless to say, I'm so glad for the advice because it would have been MUCH  more difficult with out using this program.

Next I had to learn how to use it, and fast before the free trial ran out. Thank god for YouTube and specifically the Balkan Architect channel's short tutorials for each piece of the puzzle. Anyone learning Revit, just binge this while tinkering in your project and you'll become fairly capable, fairly fast.

So it still took a while (nearly 4 months) to get to a comfortable design and get it into a presentable format to submit for permits. It started by drafting basic outline of the layout, then printing it off so that I could write in the dimensions on it while measuring the existing building. I literally took a tape measure and laser measure to the wall and hung from ladders to measure ceiling/floor heights. Then I took those and adjusted my basic outline to a more accurate picture of the exiting building. From there, it was the fun part for someone detail oriented as myself. I used a variety of Design Options to decide on the layout of various parts of each unit (overall unit makeup, kitchen style, bathroom layout, etc.) and make sure that I could lay out the units in a way that was both marketable, functional (water walls of each units stacked), and livable. Once I got it to a place that felt close, I started laying out different sheets for printing the drawings out then annotating/labeling everything. Eventually I got it to a point that I could submit to the city for approval (really just to enter their maze again).

Here are a couple pictures of the drawings that I came up with. Overall I think I'd get a passing grade for my rough semester at tinkering in architecture.


 As a basic description of the final design that I ended up with: it turned out as 2 units and a separate basement. The 1st floor unit is entered from the street of East Clifton (top) into a kitchen/living room with a hallway back to 2 bedrooms and a single bathroom tucked under the back steps (washer/dryer directly under the steps). The second unit is on both the 2nd and 3rd floors and was accessed via the back steps through the back door/steps off of Lang Street. The back steps lead into a large kitchen/sitting area on the 2nd floor with 2 other bedrooms and a bathroom. Continuing up the new steps to the 3rd floor puts you into the living room and a "bonus room" with ensuite bathroom at the far end of the 3rd floor (this is the room that will be an issue with the city in the next blog post). It also reopens many bricked-in windows and restores the cornice to the outside of the building.

January 17, 2019

Bizarro-Cincy - the VBML saga

In our last episode, we were making quick progress on interior demolition and closer to reconstruction when the city stepped in to slam on the brakes. 

Now some of it started with miscommunication about the permitting needed for demolition. But the Vacant Building Maintenance License (herein always abbreviated VBML) was something that I knew was coming when I bought the vacant building. I just didn't think they would jump on me so fast, given all of the other vacant buildings surrounding me being left alone. If only we got this service everywhere...

The previous owner was given the title "worst owner in OTR" and actually had the city trying to take his properties from out of his negligent hands. They came at him with all of their teeth, and failed to wrestle them from his grip using the law. Luckily he sold out before his negligence led to the need for demolition of his historic buildings. Mine was one of the better ones he had, but was squarely on the city's radar. In under a month after the transfer, they were on me for a VBML.

Now the VBML serves an important purpose - it requires you to meet 13 guidelines that ensure safety of these vacant buildings for the public and any first respondents (like fire fighters) that may need to enter. It makes sure the doors stay locked, windows boarded, and roof from leaking; among others. It also makes sure you have general liability insurance in case something happens.

Unfortunately, even though I had every intention of complying with the 13 guidelines (they are pretty common sense after all), I had gotten caught with my pants down after the Stop Work order, where I wasn't allowed to remove the last debris. So by the time the VBML inspector showed up, all that I could do was pile it up and make sure there were clear pathways for people to easily walk around. The inspector unsurprisingly said he preferred that it was gone entirely, but said he was ok with its current state given the circumstances. OK, cool. There were a few items to do (cover a few holes better and strengthen the railing) but generally it seemed that I was almost in compliance.

That's not all that comes with a VBML though... The city's stated goal is to encourage redevelopment by either #1 charging a hefty (and growing) annual fee as a vacant building tax or #2 giving a 2-year waiver if you can show a development plan. Sounds great right? 

Except they mostly charge the VBML fee ($900 year 1 & growing an additional $900 higher each year after) to responsive owners. Deadbeats that don't respond are never held accountable or are grandfathered in. Remember all of the vacant buildings surrounding me that the city leaves alone... how many fees have they sucked out of them? Even when they are successful, the fees only ends up in the city's pocket and saps away resources that should be put back into these buildings instead. It's a broken system, but I have a suggestion below*. 

The second option is the direction that inspectors point responsive owners and it sounds easy - just have a development plan (also pay the $130 application fee - that's not a penalty tho...) and you'll get a waiver to get us out of your hair for 2 years. The hard part is that they want a full development plan in 30 days. This is a little unreasonable given most contractors are too busy right now to even answer the phone for a small project and also good luck having financing secured in that time frame, especially when you just made the purchase and are still getting your own arms around the property.

Luckily my inspector said he'd help me out by giving me a little longer than 30 days.... until he then sent a letter that I now had 21 days left anyways. Thanks, buddy. Simple he said, but some of us have day-jobs. After freaking out a little, I called some others that have been through this process before and the consensus was that the way forward was ... lie... don't commit fraud, but give them a way that you COULD develop it. It's definitely not the way that 95% of them actually WILL happen, but they know this and just want some smoke/mirrors. I COULD cash in my whole 401k to do this project, but I'll let you in on a little secret, I definitely WON'T be taking that option. So yet another well intended way to incentivize actual redevelopment that I doubt really delivers results. Maybe a little smoke up your ass feels better than a passing breeze though, I guess.

So with the inspector being generally satisfied with the conditions of the space, I spent all of my time on the paperwork of the development plan. I put together basic floor plans, made up a construction budget, and printed out a page from an account with that enough cash in it (wonder what you do if you aren't that lucky?). I took me quite a while to measure the building and render the floor plans with free software. I also did more than just half-ass my construction budget. But ultimately, I turned it in in time and then scheduled another walk-through.

In this time, I had also been given a verbal from the inspector that issued the Stop Work order that I could finish cleaning up the downed debris, but hadn't had time between my day-job to do both paperwork and clean up. The VBML inspector's general satisfaction last time made me think that it wasn't a "gotta have" right now, but that it would be a "nice to have". So of course he changed his mind (and I can' really blame him looking back now) during this inspection. I just wish I would have known so that I could have hired Junk King to clean it up while I was doing paperwork. Now I had just under a week and it was a scramble and another vacation day taken off work.

After all that (and lost brain cells and the stress), he said I was ok, but his supervisor would have to give final approval. 2 months later I got something in the mail telling me that I got the waiver. In that meantime, there might have been a Halloween keg party. It's hazy.

So in one month, I ended up doing more to physically redevelop the building than in 4 months of dealing with the city. Welcome to Bizarro-Cincy.


* To me, it would make more sense for the fees that are collected to be kept in escrow with the property, so that they could build up into a larger incentive to redevelop it. Whomever obtains the certificate of occupancy should get the balance** of the funds that past owners paid in. It would also allow owners to recover more of the fees for use towards renovation by allowing the built up balance as a way to take risk out of the deal for lenders to finance redevelopment.

** Minus inspection fees from the city at a set rate (~$100) for those actually performed.

January 16, 2019

Step 1: Clean Out

After closing on the new building, one of the first things that I did was to secure the doors with new locks and make sure that the windows were boarded well. Once that was set, I focused on the other building for a week or two (last post) before getting started in this new building at 201 E Clifton.

My next step was calling the city to see if I needed any sort of demolition permit before I started cleaning out the inside. The response I got was "Not if you aren't tearing down the whole building or making structural changes". (Please note that this is NOT accurate info as we'll see later) Cool, I'm just taking down drop ceilings and interior partition walls, so no load bearing walls or any exterior structure, so I guess I'm good to go.

Here are some of the basic "before" pictures from day 1:


Basically this was a former Denhart building - converted in the 1970s to low-income housing using a standard template: drop ceiling height (drop panel ceiling in this case), drywall on furring strips over the original plaster on brick (here beat to hell), cheap busted doors (no mercy from Jesus on this one), smaller aluminum windows than the openings & metal grates on exterior (some hidden interior detail left above here), and shitty bathrooms (literal dried shit in this toilet's whole bowl). Pipes had been stolen as well as the boiler & associated radiator piping, which is also typical Denhart. Electric service to the building was disconnected at the street (important step before any demo!). Water service to the meter, all pipes disconnected and drain pipes cracked/needing replaced.  

In short, very little to salvage in what could be seen. I needed peel back the layers of the onion to see what the bones to work with looked like though. 

Started with protective gear - gloves, work boots (still didn't stop one nail from reaching my foot), dust mask (preferably a respirator), hard hat, and eye protection. Then first thing to come down was the drop ceiling - luckily just panels and not drywall. Popped out each panel and stacked, then used wire cutters to bring down the metal frame (save for scrap metal). 

My dad and I made quick work of it. 


Next, I identified any load-bearing walls. Since I could see from exterior wall to exterior wall through the drop ceiling cavity and no interior partition walls even connected to the true ceiling height, this was a good sign that they were not supporting anything. Time for the fun part.


(Panels down and stacked)


(Partition walls don't connect to actual ceiling height)

 (Falling wall paper hides the view from exterior wall to exterior wall in the ceiling cavity) 


Unlike HGTV, there is a smarter way to do demo on these partition walls.
#1 Use a crowbar to pop baseboards, door casings, and door frames. I found that even metal door frames were no match for a crowbar - just get in behind it on one spot then twist, repeat.
#2 Break off the drywall in large pieces (to make moving & clean up easier). I found that using a pick ax tool like this was ideal - cut the drywall face with the ax face until you can get the hoe face behind the drywall (in the stud cavity), then pull outwards and the drywall should pop off the nails/studs in a large sheet towards you. Once you get one side done, just hit from the backside for the other (see above).
#3 Break down all of the wood stud walls the smart way. First, put down the sledge hammer or pick ax. Next pick up the Sawsall with a blade meant to cut wood & metal nails. Use it to cut along the top of the sill plate (bottom horizontal board at the floor level) where the vertical studs start up. Cut the nails connecting it to the bottom, then push over the wall when only a few are still holding it up. Once on the ground, either finish cutting the remaining gaps between studs along the former header plate (top of wall) or just lift each vertical stud perpendicular to the rest of the wall (nails should pull themselves out). Now you have lumber that you might be able to reuse (use crowbar to get drywall nails out if you are going to) or at least carry out more easily.

And you didn't even throw your back out!

(Good form by my dad on the drywall, but wrong tool [crowbar, not pick ax] means smaller pieces)


(Between steps #2 & starting #3)

Repeat on the exterior walls by getting the hoe end of the pick ax between the furring strips in the air cavity behind the drywall and in front of plaster.

Ok, great. It's all down, but that was a lot of stuff that needed to go somewhere. Ideally you had a dumpster outside where you could carry your drywall & ceiling tiles to directly (so you don' need to move things twice!). I didn't have one so in the interim I had a stack/pile of drywall, a stack of ceiling tiles, a stack of studs (lay down; not against the wall like me), and a pile of metal scrap (from ceiling frame). You are now at this point.


The next step is safety. First, use some of that scrap lumber to build a temporary railing on this stairway opening. Second, cover any smaller holes in the floor with plywood to prevent rolled ankles.

(Railing for safety) 

Next, you need to get all this construction debris out of here ASAP. I had Junk King (they bring a smaller dumpster truck and then provide labor to fill it for you) take some of the smaller/harder to handle stuff, then ordered a street dumpster (with city street permit) to fill myself with the easy to handle things. Pack the ceiling tiles and big pieces of drywall as compact as possible at the bottom  not just haphazardly (otherwise it wastes space). Lumber is last on top or can be salvaged. Craigslist has plenty of scrappers that will come take your metal for free - if you don't want to drive it down and collect a few bucks yourself.

This next step is more dependent on your future plans, but I took down the loose plaster/lath ceiling next. It's going to get messy, so wear protective eye gear, a hard hat, & a dust mask! I used the pick ax again to get behind it and and pull down. My plaster was coming off already so a quick touch knocked it to the floor. Generally I would knock the plaster then pull down the lath in a section before moving the ladder. I did it from a ladder to stay above the falling debris and pull it while off to the side, so that it didn't fall onto me.


(Piles of lath like this are super flammable and dangerous to leave inside the building)

I actually ended up burning the wood lathe in my backyard in a friend's fire pit cage. It took a while, so I'd probably try to fit it into the dumpster next time in the gaps. The plaster is heavy as ****. Junk King earned their weight in gold that day (like 90 degrees too) hauling it out.


It was about at this point that I got the brakes put on me by the City of Cincinnati. Everything was down, there were things like this just about to be hauled away, and I had just called to have the full street dumpster hauled away the next morning. Then a building inspector happened to drive down my street that evening and see drywall dust leading from my door to said dumpster and left me this present:

Remember way at the beginning in the 2nd paragraph when I called the city to find out whether I needed a permit to do demolition? It wasn't accurate info. You need a permit if you are going to remove any drywall (it can change the fire-rating of a wall assembly when it's removed to make a building less safe - I later learned...), so that drywall dust was enough evidence for this Stop Work order without even looking inside. Apparently the needed demolition permit is typically gotten at the same time as the normal building permits, and not separately like I should have done here - you know, if I was told that.... just saying...

In addition to this, a totally separate building inspector set up a wall-through inspection to reissue a Vacant Building Maintenance License (VBML) on the property (a carry-over from the previous owner). That whole saga is the next post, but needless to say he wanted the debris gone immediately...

So at this point, I was left in at a catch 22 of needing to remove downed debris and not being allowed to work.

--------
Side note: Once you get through the BS, you are now at this point below (and at an optimal time to host a spooky vacant building Halloween party). Keep at it.


Murder in my courtyard 6/1/2018

Imagine that you are in the exact middle of a mosh pit surrounded by a thousand people at Bunbury 2018 with Chainsmokers playing in front of you, and then somehow you see that you have a text and multiple missed calls from your neighbor. "There's something happening at your building and police are there now. I heard gun shots and saw someone firing into your courtyard."

Oh, shit.

By the time that I made it out of the sea of people and walked back home, the police and fire fighters had already been on the scene for a while. Another neighbor's cameras has caught a lot of the event on film like an episode of Cops, so we knew most of what had happened - just had no clue why.

My front gate had bullet marks. It turned out that I was "lucky" according to the fire fighters because since it happened outside, they could hose off the blood and bleach the smell; otherwise it would have been mine to clean up. After answering all their questions and waiting for hours for them to complete the investigation, we were allowed back inside and able to go to bed after a traumatic night. Not a lot of sleep.

Unfortunately, this was just the start of the bloodshed that weekend. It was the first of 3 murders in 3 days and a few more that week. The calmest summer yet for gun violence since I had moved here over 5 years ago had just spiked abruptly. Even the news media & 3CDC were on spin control, as they feared it would deter visitors to the neighborhood. It had been a while since anyone questioned OTR's newfound safety, including me, and suddenly it was now on my doorstep, literally.

The next morning I felt like I should do something. To prevent it again - but how, it was so random? To wash it away - it was already bleached, but another round helped clear my mind. As I sprayed, the family of the victim came by to just see where it happened. A police grief counselor came over to talk to them. As I turned to go back inside, the uncle drove his car to the curb in front of the building and stuck a 40oz Colt 45 out of his window. We both watched it empty and he sped away.

I still felt like I needed to do something. As the bodies continued to fall that week, it built on me. I decided to see if I could get a Before I Die art installation from an Art Academy student to help start a community conversation around these deaths. I made another board that said "Life is too short: to be/not to..." and put it in front of my building. The police and a few neighbors held a procession around the blocks and started writing with chalk on the boards to give some inspiration to others on what they could do before they die or in their short lifetime. It didn't seem to spark the conversation we hoped - more just as a target for vandalism and the anger. After a few weeks we took them down. 

It was a little while after that that the memorials started in front of my building. It started with balloons on my front gate that I moved it to a nearby street sign. It quickly escalated to candles, flowers, and more balloons. As the flowers withered, I cleaned them up. As the balloons popped, I cleaned them up. Then they began to be plastic flowers and mylar balloons. After 3 months of playing gravekeeper, I had had enough and needed closure myself. I cleaned them up more frequently and it escalated further to them tagging the sidewalk with graffiti, then even the side of my building. The city power-washed the spray paint, but I had to send that this needed to be taken elsewhere. I posted signs directly memorials to his actual grave site. They took the signs down at first then eventually stopped. Every once in a while they'll be back and taken down promptly. It's been a battle over turf that the victim had only know for approximately a month.

The aftermath was the worst part for all involved. It turned out that the deceased victim had started dating my tenant about a month prior to the murder. That was the connection that brought him to his final spot here. And it started a ripple effect that caused a search of my tenant's apartment where they found a gun that violated her dad(also my tenant & living together)'s parole. Now her dad is in jail for 3 years, she can't make rent (and wasn't even on the lease officially), and I had to be the bad guy to end their MTM lease. They had been my tenants for 4+ years and steered clear of all of the drugs and gun violence in the area for much longer - it only took one mistaken month to sink their ship. It was really sad and hard.

First priority: Refilling 203-205 apartments & short-term rental subletting

It might seem counter-intuitive, but it was actually my first action to take steps to shore up longer-term cash flow from my existing 6-unit building rather than to focus immediately on 201 E. Clifton.

I had converted all of the existing tenants' leases towards month-to-month tenancy in order to prepare for the impending construction. Now that the rehab was on hold, I went back to get them signed for longer term leases to cut my risk of them leaving.

I also had to refill the vacancy in 205#2 that I had intentionally not re-leased after the girls left. This was a big hole in my cash flows since it was the largest and nicest apartment that I have. I had actually tried to refill it for months (since February) but even after 75 showings and dropping the price, I was struggling to find a tenant. I had everyone from out of towners from all ends of America to locals to neighbors to city council candidates and nothing. The common refrain was not having laundry or air conditioning provided were deal breakers. Even those that would look passed these issues and fill out an application, they would vaporize and go MIA before signing a lease. Marketing while it's cold out didn't help. 

Finally around the time that I closed on 201 E Clifton, I was approach by a local college student with a short-term rental business. He would sign a lease, completely decorate and furnish the apartment, add nicer locks, and manage the rentals if I would sign off on his ability to sublet the apartment. My monthly rent would come from him regardless of how often he rented it and he would keep the difference in what he earned. He also would clean the apartment and halls regularly as well as repair any damages.

To say that it has been a blessing is an understatement. Beside it making the lack of laundry irrelevant, the window units that he installed haven't had any complaints. It's easy to tell who is staying there and I've had positive interactions with his guests and gotten similar complements from my other longer-term tenants. The few times that guests were loud, it was only a few hours and then they were gone the next day (I wish I could say the same of my other tenants).

It's been amazing to hear the stories of people visiting Cincinnati. I never realized how many families come to town regularly for testing at Children's Hospital (really made me appreciate the quality of care we have locally). It makes me happy that they enjoy the experience of staying in my building while they are here (and want to come back). It's a good thing.